 如何开发插件
本文以hello-world-plugin插件为例,帮助您快速掌握Fastcms一个插件的开发流程
# 准备工作
# 创建插件maven工程
如下图所示
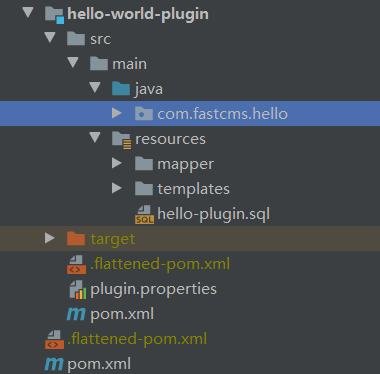
提示
推荐单独创建插件工程,然后引入fastcms,如下代码所示,在插件的pom.xml添加fastcms的依赖
<dependency>
    <groupId>com.fastcms</groupId>
    <artifactId>fastcms-web</artifactId>
    <scope>provided</scope>
</dependency>
2
3
4
5
# 创建plugin.properties文件
在插件工程的src同级目录下创建plugin.properties文件,文件内容如下
plugin.id=hello-world-plugin
plugin.class=com.fastcms.hello.HelloPlugin
plugin.version=0.0.1
plugin.provider=wjun_java@163.com
plugin.description=hello, fastcms plugin world
plugin.dependencies=
2
3
4
5
6
# 创建插件入口程序
public class HelloPlugin extends PluginBase {

    @Override
    public String getConfigUrl() {
        return PluginUtils.getConfigUrlHost() + "/hello";
    }

    public HelloPlugin(PluginWrapper wrapper) {
        super(wrapper);
    }

    @Override
    public void start() {
        super.start();
    }

}
2
3
4
5
6
7
8
9
10
11
12
13
14
15
16
17
提示
插件入口程序中的getConfigUrl为插件配置界面访问地址,通过该方法注册给Fastcms,如果插件无需额外属性需要设置,无需实现该方法
插件入口程序中的runSqlFile(String sqlFile)可以让插件启动的时候执行存放在resources/sql数据库脚本文件
# 在插件中开发Controller
由于我们的插件通常都需要一些辅助配置需要设置,所以需要通过controller跳到对应的插件配置界面
# 第一步:创建controller
@Controller
@RequestMapping(FastcmsConstants.PLUGIN_MAPPING + "/hello")
public class HelloController {

    @Autowired
    private HelloService helloService;

    @Autowired
    private HelloComponent helloComponent;

    @GetMapping
    public String index() {

        HelloPluginMapper bean = ApplicationUtils.getBean(HelloPluginMapper.class);
        System.out.println(bean);

        List<HelloService> extensions = PluginUtils.getExtensions(HelloService.class);
        extensions.forEach(item -> item.sayHello());

        return "hello";
    }

    @GetMapping("say")
    @ResponseBody
    public Object say() {
        return RestResultUtils.success("hello fastcms");
    }

}
2
3
4
5
6
7
8
9
10
11
12
13
14
15
16
17
18
19
20
21
22
23
24
25
26
27
28
29
我们的controller跳到一个hello的页面,所以我们需要在resources/templates目录下创建一个hello.html
如果无需配置,我们的controller也可以直接返回json数据
# 第二步:新建html页面
<#import "/_comm.html" as layout>
<@layout.header "hello world plugin">
    <style></style>
</@layout.header>
<@layout.body>
    <div class="py-5 text-center">
        <h2>Checkout form</h2>
    </div>

    <div class="row">
        <div class="col-md-12 order-md-1">
            <form id="myForm" class="needs-validation" method="post" action="/fastcms/api/admin/config/save">
                <div class="mb-3">
                    <label for="username">Username</label>
                    <div class="input-group">
                        <input type="text" class="form-control" id="hello_username" name="hello_username" placeholder="Username" required>
                        <div class="invalid-feedback" style="width: 100%;">
                            Your username is required.
                        </div>
                    </div>
                </div>

                <div class="mb-3">
                    <label for="email">Email <span class="text-muted">(Optional)</span></label>
                    <input type="email" class="form-control" id="hello_email" name="hello_email" placeholder="you@example.com">
                    <div class="invalid-feedback">
                        Please enter a valid email address for shipping updates.
                    </div>
                </div>

                <hr class="mb-4">
                <button class="btn btn-primary btn-lg btn-block" type="submit">保 存</button>
            </form>
        </div>
    </div>
</@layout.body>

<@layout.script>
    <script>
        $(function () {
            submitForm({
                hello_username: { required: true},
                hello_email: { required: true},
            },{
                hello_username: {required: "请输入用户名"},
                hello_email: {required: "请输入密码"},
            })

            var params = new Array();
            params.push("hello_username");
            params.push("hello_email");
            getConfigFormData(params);
        });
    </script>
</@layout.script>
2
3
4
5
6
7
8
9
10
11
12
13
14
15
16
17
18
19
20
21
22
23
24
25
26
27
28
29
30
31
32
33
34
35
36
37
38
39
40
41
42
43
44
45
46
47
48
49
50
51
52
53
54
55
# 在插件中开发拦截器
我们提供一个@InterceptPath注解,用来标记插件中的拦截器,注册到Fastcms
代码如下
@InterceptPath({ "/**/plugin/hello/**" })
public class HelloInterceptor implements HandlerInterceptor {

    private static final Logger log = LoggerFactory.getLogger(HelloInterceptor.class);

    @Override
    public boolean preHandle(HttpServletRequest request, HttpServletResponse response, Object handler) throws Exception {
        log.info("=============>>>HelloInterceptor.preHandle");
        return true;
    }

}
2
3
4
5
6
7
8
9
10
11
12
如上拦截器,将对所有访问/plugin/hello的url进行拦截
# 在插件中操作数据库
某些业务情况下,我们需要在插件中创建表,操作数据库
# 创建mapper类
public interface HelloPluginMapper extends BaseMapper<Hello> {

}
2
3
在resources/mapper目录下新建mapper.xml
<?xml version="1.0" encoding="UTF-8"?>
<!DOCTYPE mapper PUBLIC "-//mybatis.org//DTD Mapper 3.0//EN" "http://mybatis.org/dtd/mybatis-3-mapper.dtd">
<mapper namespace="com.fastcms.hello.HelloPluginMapper">

</mapper>
2
3
4
5
# 使用mapper类
在controller或者service中如下使用
HelloPluginMapper bean = ApplicationUtils.getBean(HelloPluginMapper.class);
由于mybatis-plus Mapper注册的特殊性,暂时不支持注入mapper,后续会考虑支持
# 插件打包
最终我们要把插件打成jar包或者zip包,如果有依赖除fastcms之外的第三方jar的情况下,通常打成zip包 完整的插件打包pom.xml文件代码如下
<?xml version="1.0" encoding="UTF-8"?>
<project xmlns="http://maven.apache.org/POM/4.0.0"
         xmlns:xsi="http://www.w3.org/2001/XMLSchema-instance"
         xsi:schemaLocation="http://maven.apache.org/POM/4.0.0 http://maven.apache.org/xsd/maven-4.0.0.xsd">
    <parent>
        <artifactId>plugins-root</artifactId>
        <groupId>com.fastcms</groupId>
        <version>1.0-SNAPSHOT</version>
    </parent>
    <modelVersion>4.0.0</modelVersion>

    <artifactId>article-field-plugin</artifactId>

    <properties>
        <plugin.id>article-field-plugin</plugin.id>
        <plugin.class>com.fastcms.plugin.article.field.ArticleFieldPlugin</plugin.class>
        <plugin.version>0.0.1</plugin.version>
        <plugin.provider>wjun_java@163.com</plugin.provider>
        <plugin.description>文章等扩展字段插件</plugin.description>
        <plugin.dependencies />
    </properties>

    <dependencies>
        <dependency>
            <groupId>com.fastcms</groupId>
            <artifactId>fastcms-web</artifactId>
            <scope>provided</scope>
        </dependency>
    </dependencies>

    <build>
        <plugins>
            <plugin>
                <groupId>org.apache.maven.plugins</groupId>
                <artifactId>maven-antrun-plugin</artifactId>
                <version>1.6</version>
                <executions>
                    <execution>
                        <id>unzip jar file</id>
                        <phase>package</phase>
                        <configuration>
                            <target>
                                <unzip src="target/${project.artifactId}-${project.version}.${project.packaging}" dest="target/plugin-classes" />
                            </target>
                        </configuration>
                        <goals>
                            <goal>run</goal>
                        </goals>
                    </execution>
                </executions>
            </plugin>

            <plugin>
                <groupId>org.apache.maven.plugins</groupId>
                <artifactId>maven-assembly-plugin</artifactId>
                <version>2.3</version>
                <configuration>
                    <descriptors>
                        <descriptor>
                            src/main/assembly/assembly.xml
                        </descriptor>
                    </descriptors>
                    <appendAssemblyId>false</appendAssemblyId>
                </configuration>
                <executions>
                    <execution>
                        <id>make-assembly</id>
                        <phase>package</phase>
                        <goals>
                            <goal>attached</goal>
                        </goals>
                    </execution>
                </executions>
            </plugin>

            <plugin>
                <groupId>org.apache.maven.plugins</groupId>
                <artifactId>maven-jar-plugin</artifactId>
                <version>2.4</version>
                <configuration>
                    <archive>
                        <manifestEntries>
                            <Plugin-Id>${plugin.id}</Plugin-Id>
                            <Plugin-Class>${plugin.class}</Plugin-Class>
                            <Plugin-Version>${plugin.version}</Plugin-Version>
                            <Plugin-Provider>${plugin.provider}</Plugin-Provider>
                            <Plugin-description>${plugin.description}</Plugin-description>
                            <Plugin-Dependencies>${plugin.dependencies}</Plugin-Dependencies>
                        </manifestEntries>
                    </archive>
                </configuration>
            </plugin>

            <plugin>
                <artifactId>maven-deploy-plugin</artifactId>
                <configuration>
                    <skip>true</skip>
                </configuration>
            </plugin>
        </plugins>
    </build>

</project>
2
3
4
5
6
7
8
9
10
11
12
13
14
15
16
17
18
19
20
21
22
23
24
25
26
27
28
29
30
31
32
33
34
35
36
37
38
39
40
41
42
43
44
45
46
47
48
49
50
51
52
53
54
55
56
57
58
59
60
61
62
63
64
65
66
67
68
69
70
71
72
73
74
75
76
77
78
79
80
81
82
83
84
85
86
87
88
89
90
91
92
93
94
95
96
97
98
99
100
101
102
103
# 小结
通过以上步骤,我们可以开发Fastcms插件,把插件包安装到Fastcms即可使用插件,无需重启服务器